In a world where meticulous record-keeping reigns supreme, mastering the art of filling out a receipt book is indispensable for businesses and individuals alike. From tracking expenses to maintaining financial transparency, "How to Fill Out a Receipt Book: The Ultimate Guide" offers a comprehensive roadmap for navigating this essential aspect of financial management.
Whether you're a seasoned entrepreneur or a conscientious consumer, this guide is your key to unlocking the power of organized documentation and fiscal responsibility.
Did you know that a missing receipt could cost you money – whether it's a denied reimbursement, an overlooked tax deduction, or a disputed return?
This guide will demystify the world of receipt books. We'll cover everything from the basic elements to specialized types for rent, services, and even those popular Adams or Staples brands. By the end, you'll be a receipt-filling pro!
Seems obvious, but ensure you have the right book! Generic receipt books work for most scenarios, but some businesses might have personalized pre-printed options for specific services. For example there are specific receipt formats for plumbers, HVAC, roofing, etc.
Write the current date of the transaction. This is usually written at the top right section. It is crucial for accurate record-keeping.
Just above the date you can have sequential numbers. This can be pre printed as in generic formats. They can have a unique set of numbers if it is a personalized or custom printed format.
Write the customer's or business name clearly. If it's a walk-in customer with no prior relationship, you might simply write "Cash Sale." A more detailed description of the customer is necessary in some cases.
For example, in the case of home delivery services, it's important to include both the customer's name and full address on the receipt. This ensures accurate delivery and provides a clear record of the transaction, helping to resolve any issues that may arise during delivery.
You, the business providing the service, can write you contact information at the top left. That includes your business names, address, phone, and website address. Personalize it with a logo if you can.
Write the details of the products or services sold in this section. This might just be a few words as in the case of a person renting a room.
However, more details are required as in the case of an equipment rental company. You need to write the quantity/units, description, name of product/service, and corresponding price.
Do the math! Write down the subtotal, taxes, and total. Calculate the total cost for each line by multiplying the quantity or other unit of measure by the corresponding price.
Let’s look at an example where the unit of measure in this case is Hours. Your cost for House Cleaning would be $50 since you charged $10 per hour and worked 5 hours. See example below.
Hours | Description of Work | Rate | Cost |
5 | House Cleaning | $10 | $50 |
3 | Cooking | $12 | $36 |
3 | Shopping | $15 | $45 |
Subtotal | $131.00 | ||
Taxes (6%) | $7.86 | ||
Discounts | ($0.00) | ||
Total | $138.86 | ||
Indicate whether the payment was made in cash, by check, credit card, or another method. If paid by check, include the check number.
The receipt serves as proof, so ensure both you (or the business representative) and the customer (if applicable) sign the receipt.
If you've ever wondered about those colored pages in your invoice or receipt book, they're for carbon copies! These specially treated sheets allow you to create multiple copies of a single receipt with just the pressure of your pen. But unlike the messy process of using traditional carbon paper, receipt books utilize a modern technology called carbonless paper.
Carbon Paper: This was the old-school method, where a separate sheet coated with a black waxy ink (the carbon paper) was placed between two sheets of regular paper. Pressing down while writing transferred the ink, creating a duplicate on the sheet below.
Carbonless Paper: Modern receipt books use specially treated paper. The top sheet has a microencapsulated dye layer, and the middle sheet has a clay coating that reacts with the dye upon pressure. This eliminates the need for a messy separate sheet of carbon paper, making handwritten receipts cleaner and more convenient.
Record-Keeping: Having a carbon copy of each receipt gives you an immediate backup, eliminating the need to rewrite information for accounting or other purposes.
Proof of Transaction: Both you and the customer have a record of the transaction (especially for handwritten receipts) in case of discrepancies. This proof of purchase can save both parties a lot of headaches.
Organization: Copies can be used for different departments (e.g., sales, accounting, etc.) and customer records, promoting better organization.
Customer: Always gets the original white receipt.
Business: Keeps at least one of the carbon copies (yellow, pink, etc.) for their records.
Additional Copies: Some receipt books have multiple copies for specific departments (e.g., sales, accounting, etc.)
Now that you grasp the basics and understand carbon copies, let's explore how to adjust your approach for different types of receipts.
How to Fill Out a Money Receipt Book (General Sales)
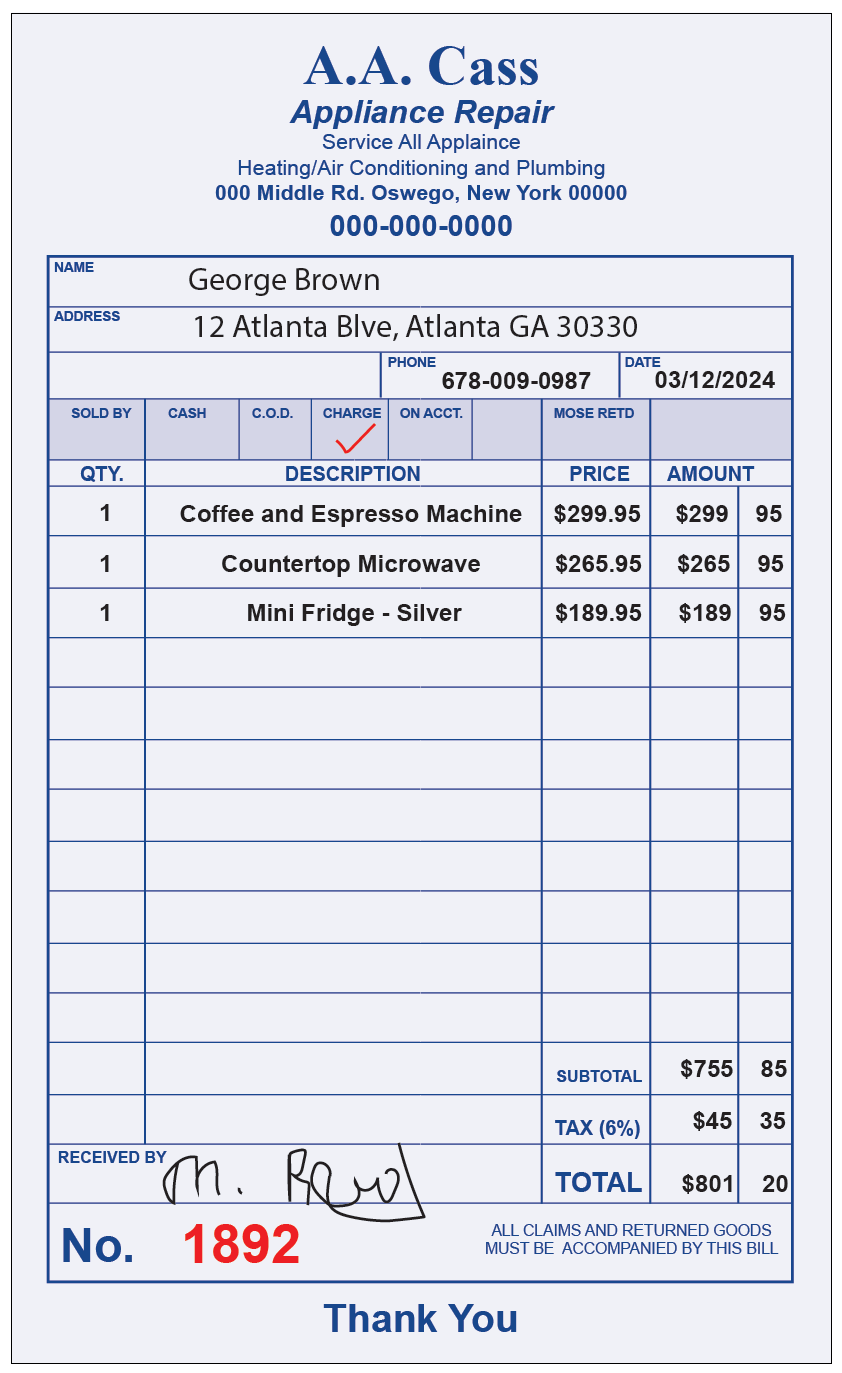
Scenario: A customer walks into your appliance store and purchases a few appliances. Here's how to document this transaction on a standard money receipt:
Key Fields:
Here is an Example with Filled-In Fields:
Remember: Both you and the customer should retain a copy of the receipt for your records!
Legal Considerations: Address whether there are specific local or state requirements for rent receipts (landlord-tenant laws).
Key Fields:
Additional Note: Emphasize the importance of both landlord and tenant keeping copies of rent receipts.
Receipt Books for Services (Babysitting, Daycare, etc.)
Scenario: A parent pays you for childcare services.
Key Fields:
Considerations: Discuss whether taxes need to be included based on your service type and income level.
How to Design a Receipt Book: Customization for Your Needs
While the basic steps of filling out a receipt book remain consistent, some situations benefit from a customized approach. Here's a look at your options for designing your own receipt book:
When to Consider Customization:
Extra Tips to Consider:
Ready to upgrade your receipt system? Explore our personalized and custom printed receipt books. Organizing financial documents for maximum efficiency!"
Conclusion
Whether you're a small business owner, a diligent individual, or simply want to get a handle on those slips of paper, mastering the receipt book is a valuable skill. By understanding the basics, utilizing carbon copies, choosing the right type of receipt book for your needs, and following our additional tips, you'll streamline your record-keeping and protect your financial well-being.
Michael Reid
Hi there! I'm Michael Reid, and I specialize in design and printing. Would you like me to help you with an upcoming project?

From my roots in Jamaica to the bustling streets of the USA, my journey into design and printing has been fueled by a passion for creativity and business. I founded Small Business Promotions, Inc. back in 2003, bringing DesignsnPring.com to life. The foundation of my work comes from not only my degree in accounting and economics from the University of the West Indies but also my hands-on-experience that started at Georgia Perimeter College.
Hi there! I'm Michael Reid, and I specialize in design and printing. Would you like me to help you with an upcoming project?

Sales & Service Team:
8AM - 8PM ET
1820 Highway 20 SE
Suite 114, PMB 1094
Conyers, GA 30013
Be the first to know about special offers, new product launches, features, events and more.